
 Gallery
As you plan to reform your name online post marriage
If you have decided to change your name online after marriage, the first place to get started is with your email address. Then you can move on to the rest of your social media accounts. This article specifically covers how to switch your Gmail account name.
Unfortunately, Gmail Account does not allow you to change your email address after you create your account. You can change your display name, but your email address must remain the same. Since it’s confusing to have your display name differ from your email address, I recommend creating a new email address.
1. Create a new email address as soon as the rock’s on your finger
There are more than 200 million Gmail users, so chances are, there’s someone out there with your name who’s already snagged the Gmail address. So do away with any silly superstitions and create your new email address ASAP. I remember signing up with Gmail when it was invite only, and I took for granted how easy it was to get firstname.lastname@gmail.com. My married name wasn’t available this way. If yours is taken too, here are some combinations you can try that still look professional:
2. Log in once in a while
If your account is inactive for around 9 months, Gmail will delete your shiny new account, and someone else could snatch it up. So make sure you log in once in a while and send an email or two, especially if you have a longer engagement.
3. Forward mail to your new email account
Once your married (congrats!), you’ll want to forward any new messages you receive from your old inbox to your new inbox.
To do this, go to your OLD email account, click the gear icon at the top of any Gmail page, choose Mail settings and open the Forwarding and POP/IMAP tab. In the Forwarding section, click Add a forwarding address. Follow the steps to complete this process.
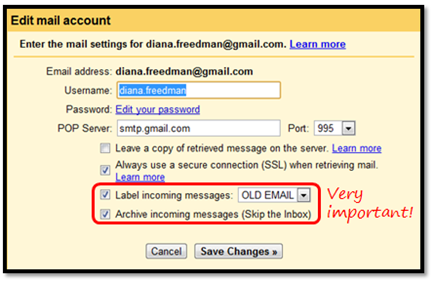
4. Import your old emails
Next, import all of your emails from your old account. Unless you’d like to start with a clean slate, but I love being able to look up any past messages, and I’m bad at remembering to log into old email accounts every 9 months.
Click the gear iconat the top of any Gmail page, choose Mail settings and open the Accounts and Import tab. Scroll down to the Check mail using POP3 section and click the Add POP3 email account button. Follow the simple steps to complete this process. Remember to automatically archive and label all of these old messages. This is very important!
If you have decided to change your name online after marriage, the first place to get started is with your email address. Then you can move on to the rest of your social media accounts. This article specifically covers how to switch your Gmail account name.
Unfortunately, Gmail Account does not allow you to change your email address after you create your account. You can change your display name, but your email address must remain the same. Since it’s confusing to have your display name differ from your email address, I recommend creating a new email address.
1. Create a new email address as soon as the rock’s on your finger
There are more than 200 million Gmail users, so chances are, there’s someone out there with your name who’s already snagged the Gmail address. So do away with any silly superstitions and create your new email address ASAP. I remember signing up with Gmail when it was invite only, and I took for granted how easy it was to get firstname.lastname@gmail.com. My married name wasn’t available this way. If yours is taken too, here are some combinations you can try that still look professional:
- lastname.firstname@gmail.com
- firstname.middleinitial.lastname@gmail.com
- firstname.maidenname.lastname@gmail.com (if it’s not too long)
- firstname.middlename.lastname@gmail.com (if it’s not too long)
- firstinitiallastname@gmail.com
2. Log in once in a while
If your account is inactive for around 9 months, Gmail will delete your shiny new account, and someone else could snatch it up. So make sure you log in once in a while and send an email or two, especially if you have a longer engagement.
3. Forward mail to your new email account
Once your married (congrats!), you’ll want to forward any new messages you receive from your old inbox to your new inbox.
To do this, go to your OLD email account, click the gear icon
4. Import your old emails
Next, import all of your emails from your old account. Unless you’d like to start with a clean slate, but I love being able to look up any past messages, and I’m bad at remembering to log into old email accounts every 9 months.
Click the gear icon
Last edited by Formatted on 25th October 2013, 11:27 am; edited 1 time in total
